Creating a BIDS Data Dictionary and Adding Semantics
Reproducible neuroimaging principles: 2b. Use standard data formats.
Actions: Standards, Annotation and provenance.
Tools: PyNIDM.
Challenge
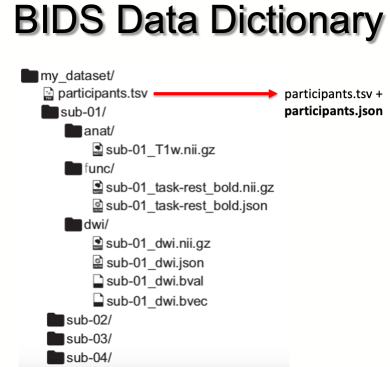
Converting your DICOM data to BIDS is a great first step in making your data more reusable. Part of the BIDS dataset are optional files containing demographics or other assessment variables collected as part of the study and provided in the “participants.tsv” file included in the BIDS dataset (sometimes called phenotype information). Without a file describing the variables included with the “participants.tsv” file, it is unclear what each variable means, the data type expected, and, if categorical, how to interpret the categories and their meaning. This file is named “participants.json” in BIDS and its description can be found in the BIDS manual. This could result in the BIDS phenotype data being uninterpretable by others beyond the person(s) who created this BIDS dataset and thus making it less reusable. Here we show you a simple python command line method for creating a data dictionary describing the variables contained within the “phenotype.tsv” file and any other assessment files contained within a BIDS phenotype directory. Finally, we’d like to be able to find this BIDS dataset when querying for datasets that contain specific types of variables (e.g. a dataset that has a measure of age) and since each dataset may specify a variable such as age using a different variable name (e.g. “age at study intake”, “MRI age”, etc.) we can associate selected variables with concepts that describe their meaning at a high level which allows us to find datasets containing a variable measured that is associated with, in this example, the concept of age. Below is an exercise to help you do this.
Exercise
Here we will learn how to create a data dictionary / annotation file “participants.json” for a simple BIDS dataset containing 2 variables: “Gender” and “Age”. Gender is a categorical variable encoding “M” for male and “F” for female. Age is an integer variable encoding the age of the participant in years after birth. Further, because we want to enable searching for this dataset across varying BIDS datasets, we’ll associate concepts with the “gender” and “age” variables, creating a “participants.json” data dictionary file to make your BIDS dataset somewhat self-describing and annotated for other uses and for search engines.
BIDS with participants.json data dictionary
Before you start
Before diving into the conversion process, it’s important to familiarize yourself with the following:
- BIDS (Brain Imaging Data Structure): A widely adopted standard for organizing neuroimaging data. BIDS enforces a specific directory structure and file naming conventions, promoting data organization, shareability, and compatibility with various analysis tools. We recommend visiting the BIDS website and browsing the BIDS starter kit
- Python: The PyNIDM bidsmri2nidm.py requires the ability to run a python script from the terminal window.
Step by step guide
Step 1: Install the necessary tools
- PyNIDM tools: To install PyNIDM tools, complete the following steps:
- Install the dependencies here: https://pynidm.readthedocs.io/en/latest/
- Create an empty python environment with Python 3.9 using Conda
- From a terminal window run with the new Conda environment active, run: $ pip install pynidm
Step 2: Run the bidsmri2nidm.py PyNIM tool
bidsmri2nidm.py \-d \~/…/bids\_dataset \-bidsignore \-o \~/…/bids\_dataset/nidm.ttlStep 3: Annotate a variable in participants.tsv called “gender”
Step 3a: Define the term
Enter a full name and a description for the term. Example:
Full Name: Gender
Description: Gender of participant
Step 3b: Choose a datatype
Select a datatype from the predefined list:
1: string
2: categorical
3: boolean
4: integer
Example selection: 2 (categorical).
Step 3c: Enter categories and labels
Input the categories and their corresponding labels:
Category 1: Male
Category 2: Female
Step 3d: Associate a concept
Search for an ontology concept related to the term (e.g., gender). Example:
Query String: gender Results: 1. Label: gender Definition: Sex or gender of the subject 2. …
Select the appropriate concept: 1.
Step 4: Annotate a variable in participants.tsv called “age”
Step 4a: Define the term
Enter a full name and a description for the term. Example:
Full Name: Age
Description: Age of participant at time of scan
Step 4b: Choose a datatype
Select a datatype from the predefined list:
1: string
2: categorical
3: boolean
4: integer
Example selection: 4 (integer).
Step 4c: Set the value range
Specify minimum and maximum values for your variable “age”:
Minimum Value: 18
Maximum Value: 120
Step 4d: Specify units
Provide units for the term:
Units: yearsStep 4e: Associate a concept
Search for an ontology concept related to the term (e.g., age). Example:
Query String: age Results: 1. Label: Age Definition: A time quality…. 2. …
Select the appropriate concept: 1.
Step 5: Validate
After the conversion completes, look at the “participants.json” file in a text browser that is now included in your BIDS directory. It should contain annotations of all the variables in your participants.tsv file. If you made any typos, you can modify this file in a text editor and save it. In addition, a “nidm.ttl” file has been added to your BIDS directory which can be used for search in the figure. Don’t worry, it has been added to a .bidsignore file so your BIDS dataset is still valid.
Next steps
For a full video showing the annotation process see PyNIDM Annotations.